To check your Personal VPN DNS entries on a Mac OSX computer while connected to SurfBouncer:
1) From the dock, select ‘System Preferences’.
2) Click on ‘Network’.
3) Select one of the available connections such as ‘AirPort’, ‘Ethernet’ and ‘PPPoE’.
4) Click on ‘Advanced’.
5) Click on ‘DNS’.
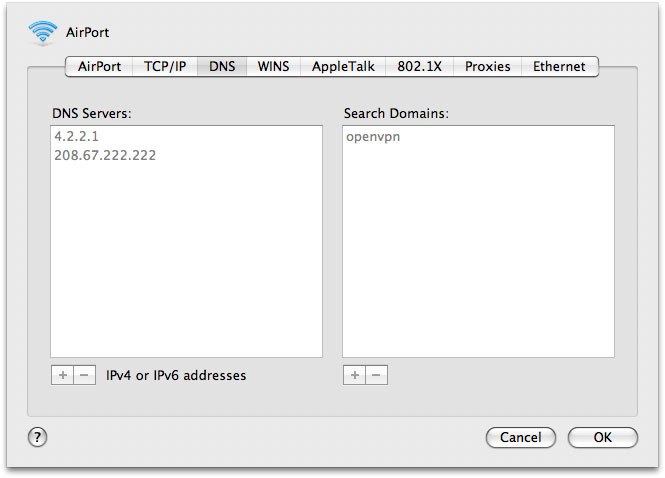
6) You should see a screen similar to the one below. The DNS servers are listed on the left.
7) Please send a screen shot and repeat for all available connections.
To take a screen shot of this page, Click on:
Command + Shift + 4 and then Space Bar
A camera will appear. Place it over the window and click. The image will be saved to your desktop.
Attach the image in your email back to us.
(Note: The actual DNS servers may be different than the ones shown above.)
To change DNS settings:
1) Exit Tunnelblick
2) From the dock, select ‘System Preferences’.
3) Click on ‘Network’.
4) Click on the lock in the lower left hand corner to unlock it, if it is locked.
5) Select one of the available connections such as ‘AirPort’, ‘Ethernet’ and ‘PPPoE’.
6) Click on ‘Advanced’.
7) Click on ‘DNS’. You should see a screen similar to the one above.
8) Click on the ‘+’ button and enter the new DNS address we provide you.
9) Drag the new addresses to the top of the list. (If there are grayed out addresses they will stay on top but are inactive.)
10) Click on ‘OK’.
11) Click on ‘Apply’ and repeat for the remaining connections.
12) Reset the lock.
13) Reboot the computer.
14) Log into Tunnelblick.
Disable IPv6
For maximum security and to prevent leaks disable IPv6 on your computer.
Open Finder
Click on Applications
Click on Utilities Folder
Double Click on Terminal.app
Copy and paste the line below into the terminal.:
networksetup -setv6off Ethernet && networksetup -setv6off Wi-Fi
Some versions of OSX require the quotes shown below. If the line above doesn’t work use the line below.
networksetup -setv6off “Ethernet” && networksetup -setv6off “Wi-Fi”
Be sure to enter that string onto a single line to issue the command properly.
Hit the enter key and reboot your computer.
If you receive an error regarding Ethernet it’s because you don’t have an active Ethernet adapter. You can ignore this error if it occurs.